

Appalachian Trail Thru-Hike Prep Series:
Part 1: Gear
Part 4: Planning, Navigation, and Cost
So, what gear do you need for your Appalachian Trail thru-hike? Having the right gear setup is crucial to having a successful thru-hike. While each hiker will have their own preferences when you get down to the specifics, there are some guidelines that are pretty darn universal.
I guarantee you that the primary reason for such a high drop-out rate among thru-hikers early on in the Appalachian Trail is due to overly heavy packs.
Here are my suggestions and some things to keep in mind:
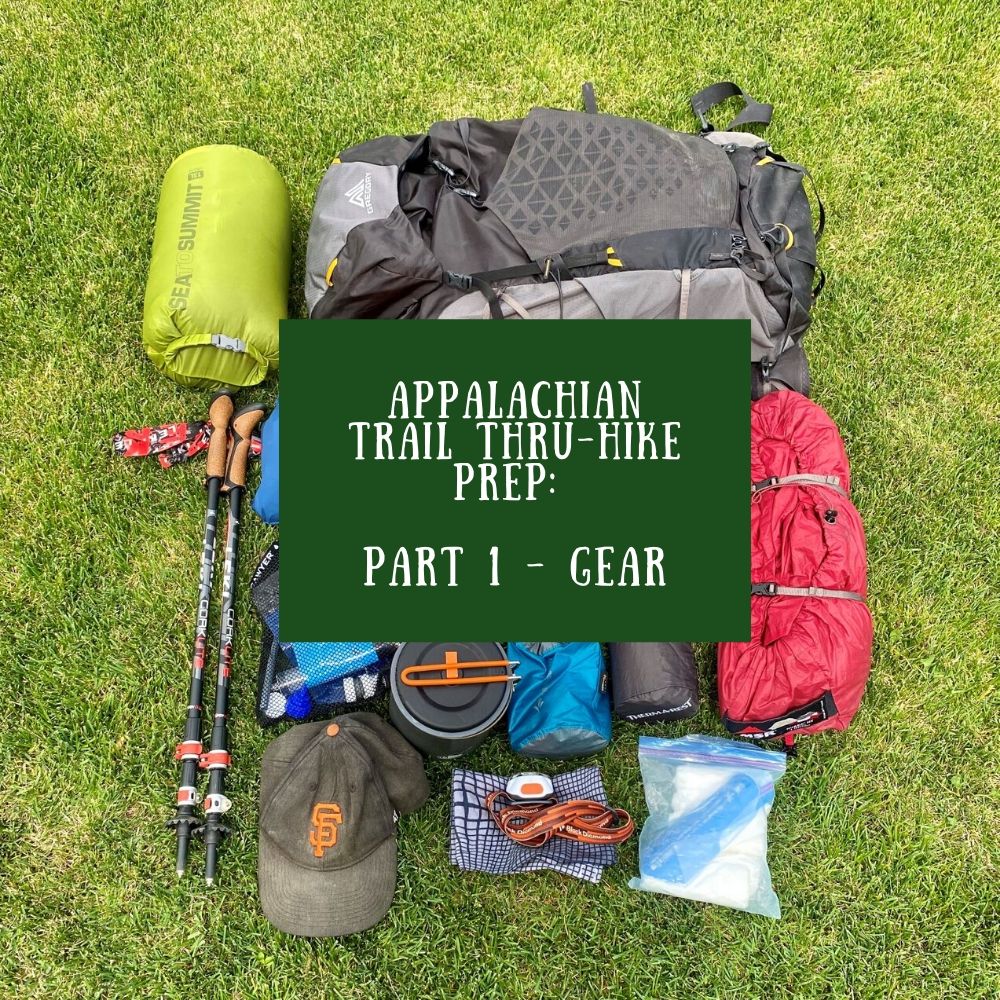
Gear List
I may receive commissions for some of the items listed on this post. They help keep this site going and are at no cost to the reader.
If I were to get gear for an Appalachian Trail thru-hike right now, my setup would look something like this:
Backpack:
- Gregory Paragon 58
 (or Gregory Maven 55 for women)
- 2 lbs. 13 oz. (stripped of “sidekick pack,” brain, and included pack cover)
- It’s definitely not the lightest pack out there, but its incredibly comfortable and durable. I’ve been using this one for a while now.
- Other good options:
- Osprey Exos 58 (Men) / Osprey Eja 58 (Women)
- Granite Gear Crown 60 (Men’s | Women’s)
- Osprey Atmos 65 (Men) / Osprey Aura 65 (Women)
- Gossamer Gear Mariposa 60 (Unisex)
- Zpacks Arc Haul 62 (Unisex)
Sleeping Bag:
- REI Co-op Magma 30 (Men’s | Women’s)
- 1 lb. 5 oz. (Long)
- Note: if you are going to be on trail in the cooler months (i.e. March/October, consider getting a 15-20 degree bag or bring a sleeping bag liner)
- Other good options:
Shelter:
- Big Agnes Fly Creek HV UL 1
- 2 lb. 1 oz. (minimum trail weight)
- Other good options:
Sleeping Pad:
- Therm-a-Rest NeoAir Xlite
- 12 oz.
- Other good options:
Water Bottles:
- 2 1-liter Smartwater bottles; 1 Platypus Platy Water Bottle (2-Liter) as backup.
- 5 oz.
Water Purification:
- Sawyer Micro Squeeze
- 2 oz.
- Other good options:
Jacket:
Rain Jacket:
Cook Set:
I may or may not choose to bring a cook set – but here are a couple good options:
Dry Sacks:
- Sea to Summit Ultra-Sil Dry Sack (13L 2x)
- 2.8 oz. (2 Dry Sacks)
Small Stuff Sacks for Organization:
Headlamp:
- Black Diamond Spot
- 3.25 oz. (with batteries)
- Other good options:
Pillow:
- Sea to Summit Aeros Ultralight Pillow (Regular)
- 2 oz.
- Worth it for a better night’s sleep!
Trekking Poles:
- Leki Makalu Lite
- Other good options:
- Black Diamond Alpine Carbon
- Kelty Cairn (Budget)
Pack Cover:
- Osprey UltraLight Pack Raincover (Large)
- 3 oz.
- I would otherwise use pack cover included with Gregory Paragon (4 oz.)
Hiking Shoes:
- Note: Do NOT get waterproof shoes. Hiking all day, every day, for several months – your feet WILL get wet – whether it be from a creek, rain, puddle, or excessive sweat. While waterproof shoes are okay at keeping water out, they are excellent at keeping water in. Your feet will fall apart. It’s much more important to have a shoe that can breathe and easily dry out.
- My shoe choice is the Merrel Moab FST 2. But each person needs to go try on shoes for themselves and see what fits. Just make sure they’re breathable.
- Consider shoes vs. boots depending on the strength of your ankles – I much prefer shoes as they are much lighter.
- You will likely go through 2-4 pairs of shoes on your thru-hike. Do NOT get multiple pairs at the start to pick up later down the trail. Your feet will expand. Also consider getting a half-size larger than you normally would at the start of your hike.
Clothes:
(My wife’s choices for the women’s options)
- 2 Pair Socks
- 1-2 Synthetic Shirt (Men’s | Women’s)
- 1 Pair Running Shorts (Men’s | Women’s)
- 2 Pair Underwear (Men’s | Women’s) – don’t skimp on undies!
- Women: Sports Bra
- 1 Pair Leggings/Long Underwear (Men’s | Women’s)
- Ball Cap
- Beanie
- Sunglasses
- Bandana
- Camp Shoes (optional) – Make sure to get something lightweight like Crocs
Other Items:
- Toiletries
- Toilet paper
- Toothbrush/Paste/Floss
- Hand Sanitizer
- Small Pack Sanitary Wipes
- Chap Stick
- First Aid
- Cloth Band-Aids
- Gold Bond (small)
- Antibiotic Ointment (small)
- Ibuprofen (small)
- Mini Lighter
- 50 ft. Paracord (for hanging bear bag)
- Rock Sack (small sack used for hanging bear bag – use one of the small Sea to Summit stuff sacks)
- Bug Spray (at least for some sections)
- Sunscreen (Small)
- Phone & Charger
- Quart Ziplock Trash Bag
- Multivitamins
All of the gear items from this list that will be on my back amount to 12-13 pounds of base weight. Not bad!
Gear Philosophy
Get The Right Gear The First Time
For those who haven’t done much backpacking – I know that gear is really expensive. But going for the cheap Walmart options will not do. You may be thinking, “Hey, I’m all good! I have that old box of camping gear in the garage I could use.” Unless you are already a serious backpacker, I will go out on a limb and say that gear in your garage will not do either.
Gear that you may use for car camping is usually incredibly heavy compared to what you will need for a long-distance backpacking trip. The cheaper backpacking gear options are usually on the heavier side as well. If you are on a tight budget, you will likely have to sacrifice by carrying a bit more weight – but if possible, really try to save up enough money to buy the right gear that will serve you well for your thru-hike.
When I first bought all of my gear, I was almost offended at what some of the prices were for supposedly higher-quality items. But as my thru-hike went on, I ended up happily spending good money to replace some of my gear items with lighter, higher-quality options.
With all this said, you won’t get it perfect from the get-go. You will likely dial in your gear setup as your thru-hike progresses when you have better understanding of what you really need in the day to day. My aim is to prevent you from making the big mistakes that will jeopardize your thru-hike on takeoff.
Get Your Base Weight to 15 Pounds or Less
What Is Base Weight? What Is Variable Weight?
Your base weight includes everything on your back minus your consumables. This is the weight that is always there, regardless of how much food or water you are carrying.
Your variable weight consists of your consumables – that is, food, water, and cooking fuel. (Note: your water storage will be included in your base weight, i.e. bottles & bladders). This weight will change drastically based on how long you hike between resupplys, how long it has been since your last resupply, what kind of food you buy, etc.
Your total weight is your base weight + variable weight. Your total weight is usually understood to include a variable weight that is freshly stocked with the average resupply.
15 pounds doesn’t seem like much at all! Is that really doable?
A 15-pound base weight may be a little aggressive for people who are unacquainted with lightweight or ultralight backpacking, but it is entirely doable. No, you won’t be doomed to failure if you go a few pounds over. But I want to set the bar high so you don’t wreck yourself with an overly heavy pack. You will feel every pound in your pack while on the trail – so try your best!
“Ounces Make Pounds and Pounds Make Pain”
This is a fundamental rule of trail life that I want to instill in you. Keep this in mind when getting your gear together for your thru-hike.
Items that weigh a mere few ounces may sound negligible. But these can add up very quickly to several pounds of additional weight that no thru-hiker has any business lugging around.
Now, I am not one of those “toothbrush cutters” (although I did cut my toothbrush so it would fit into a sandwich bag with my other toiletries!), and I’m not even an ultralight backpacker, strictly speaking. But understanding how quickly ounces add up was one of the most vital learnings I had during the first couple months on the Appalachian Trail.
Know What Not To Bring
Here are some examples of common unnecessary items that may not seem like a big deal when gathering your gear together, but will likely end up in a hiker box or sent back home before you get out of Georgia. Okay, you will need some of these items – but get smaller and/or lighter versions of them!
- Large Pocket Knife – Take a pocket knife. But get one of the mini Swiss Army knives instead of the big ones – that’s all you will really need and you’ll save several ounces in weight. You certainly will not need one of those big multi-tools.
- Extra carabiner – Ditch the extra carabiner(s) and buy a new one in town if yours breaks – that’s another few ounces.
- Nalgene(s) / Water Bladder – An empty Nalgene bottle weighs six ounces! So do most water bladders with hoses. If you are carrying two Nalgenes and a Camelbak, you are carrying an extra pound just to hold water. Instead, use Smart Water bottles. Each weighs 2oz and the plastic is of a high-enough quality to not leach nasty plastic flavor into your water and it’s reasonably durable. Just replace them every few resupply stops. You can also use an ultralight bladder with no hose.
- Excessive First Aid Supplies – All the First Aid you will probably need are some Band-Aids (the tough, cloth kind) and Ibuprofen, and maybe a small tube of antibiotic ointment (aside from any personal medication).
- Camp Shoes – Don’t bring heavy-duty camp sandals. You aren’t going to be spending enough time at camp to justify them. Get some very lightweight flops and they will be fine (I made my own along the trail by cutting up a discarded sleeping pad that were incredibly light).
- Survival Materials – Honestly, there is really no need for all the survival gear… It’s pretty difficult to get into a serious survival situation on the AT – just don’t do dumb stuff.
- Multiple Sets of Clothes – Limit the amount of extra clothes you bring. This one you will have to feel out for yourself – but I got by with just one extra pair of briefs, a light jacket, and a beanie (aside from my regular hiking clothes). I just wore my rain gear when I needed to do laundry.
I could go on and on about this, but just with the items described above, our gear setup is about five pounds lighter – which is A LOT by thru-hiker standards.
To put you more at ease, the Appalachian Trail is very forgiving by thru-hike standards. It’s tempting to take to the trail as if you were heading into the woods and never coming out – wanting to be prepared for everything and anything, able to survive for weeks on end in the wild.
Trust me, it’s not that bad! You will cross at least one road on most days if you need to make your way into town for anything. You will figure out how to do “trail-life” very quickly and what you really need.
As always, “Hike Your Own Hike.” Feel free to ditch this advice and feel out your gear as you get underway. I’m just sharing what I and many other thru-hikers found out we didn’t need.
What I am trying to have you avoid is hitting the trail with a heavy pack. Heavy packs suck the joy out of hiking and they make you prone to injury as well as excessive blistering and soreness.
Note on Cookware
If you want to get a little more hardcore, you can ditch your stove and cookware. My hiking partner and I did this about halfway through the trail. No stove, no fuel, no pot. We ate a LOT of Clif Bars and other dry food instead.
Well over a pound was lost by sending our cookware home. In addition to the weight, we had an extra hour every day to enjoy hiking. If timing is a concern to you, think about this: it takes about one hour to set up your cook set, cook your food, eat and clean up. If you hiked an hour longer every day and got an additional 3 miles in… Well, scale that by 120-180 days. It adds up.
Now, I don’t necessarily recommend this to everyone. In addition to the benefit of having a stove if you’re in the cold, having a hot meal to look forward to at the end of every day can be a serious psychological aid when you’re out in the woods for months on end. So test it out, and if you find yourself not really caring about hot food, or feeling like cooking and cleaning every night is a waste of time, don’t be too afraid to send it home. Chances are you’ll be fine, albeit slightly less comfortable at dinnertime.
I hope this was helpful in giving you a better grip on what gear you need for your Appalachian Trail thru-hike.
As always, please leave any thoughts and questions in the comments below.
Stay tuned for more posts in our Appalachian Trail Thru-Hike Prep series!
Happy Hiking!
— Motown


Article Comments